<a href=":url-reg-0:">Register</a>
By tapping the above connection clients will have the choice to enlist on your site and turn into a dynamic individual from your site.. The above connection will guide clients to the enlistment page that we will outline in this instructional exercise.. This page has every one of the alternatives for you to alter or change and you can likewise add more factor to store more data about the clients.. :) Lets do it for our locales..
Login to your free wapka account
Goto Admin Mode
Goto ES > WAP2 > Click Styles for login/enlistment interface > Click Registration page > Now you wil be on the enrollment page settings page..Here you will see one textarea where you can include codes and labels and a submit catch to spare the record.. Likewise there are labels inclined to enable you to deal with the page precisely. :)
Presently in textarea you can utilize following labels o codes to outline your enlistment page..
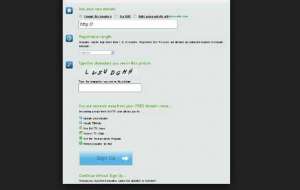
::warnings:: - This tag is compulsory, this shows the outcome to the client if his submitted inputs are right or not.. This will likewise demonstrate the message if the client name is laready tajken and the sky is the limit from there.. On the off chance that you get a kick out of the chance to plan it too you can do it b including new class in your template document with name reg_notification in styles you can include numerous different CSS labels as you like.. Remeber that these warning are encased in p tag..
::login: - This tag is likewise obligatory, with this label client will see enter box where he/she can picked his/her username, if the username is as of now taken he/she will see blunder message in view of above tag.. :)
::password1:: - This label adds the secret word field to the enrollment page.. Client can enter his/here watchword in this field.. in this label 1 implies that client needs to enter his secret word here and in the second code too which is as under, in other case the client will see blunder message..
::password2:: - This tag is utilized to affirm the secret key that client has entered in the above ::password1:: tag.. This tag is additionally obligatory as like the others..
::email:: - This field is included the enrollment page to get the client mail address with the goal that you can send welcome email or check client et cetera, this tag is additionally required.. This tag is as of now having the HTML breakline br tag toward the end..
::lpsq:: - This label adds choice to set the security question. On the off chance that the client lost his/her secret word, he/she can recover it by noting his/her set answer.. You can include claim inquiries too however that is not the extent of this instructional exercise.. This tag additionally have the br tag toward the end so next thing will be on new line dependably..
::msgfa:: - This label includes the field for the client to send YOU some information or reveal to you something or whatever.. This field is just noticeable to YOU since this field is just for administrator messages..
::captcha:: - This label includes the captcha check in your enlistment page.. With the client can just enlist if client has composed the right words from captcha.. Shockingly you can not change the styles of captcha but rather you can cripple it on the off chance that you like..
::profile:: - This label includes every one of the fields from ES > USER > USER PROFILE > STYLES FOR REGISTRATION PAGE.. You can store more information about the client with the assistance of this profile variable framework.. I won't cover it in my this instructional exercise however will be included a total instructional exercise it..
::submit:: - This label includes the submit catch which is the activity if client need to enlist in the wake of composing his/her data in different fields..
You can utilize numerous other HTML labels in this and furthermore you can utilize javascript, You can style your page with CSS.. Everything depends just on you..
After you are done simply click UPDATE STYLE catch and check your enrollment page..
caps it, we have change our enrollment n page for the clients.. Keep in mind that more wonderful the page is more you will get the individuals. Try not to attempt to over load the page or you won't get the intension of clients.. Attempt and et us know how was this instructional exercise and is it helped you??
Wapka Registration Page Code
In this tutorial I will discuss how you can design your registration page to look beautiful then before.. This tutorial was requested by the wapkatutor user!! First of all, let me introduce to you the wapka sites registration page, you can use following tag to allow users to register on y
D.P.M BD
- 109 Friends
- 301 posts